

This section of the role’s management manual is dedicated to the management of accounts. Classter platforms contain many user roles but only a specific number of user types. We will take a look at how you can apply the user roles you create or edit to actual user types that exist in the system users such as Students, Teachers, Administrators, Employees and Parents.
To manage user accounts, you will need to login as an Admin and follow the path: Dashboard > Management > User Accounts (Figure 31).
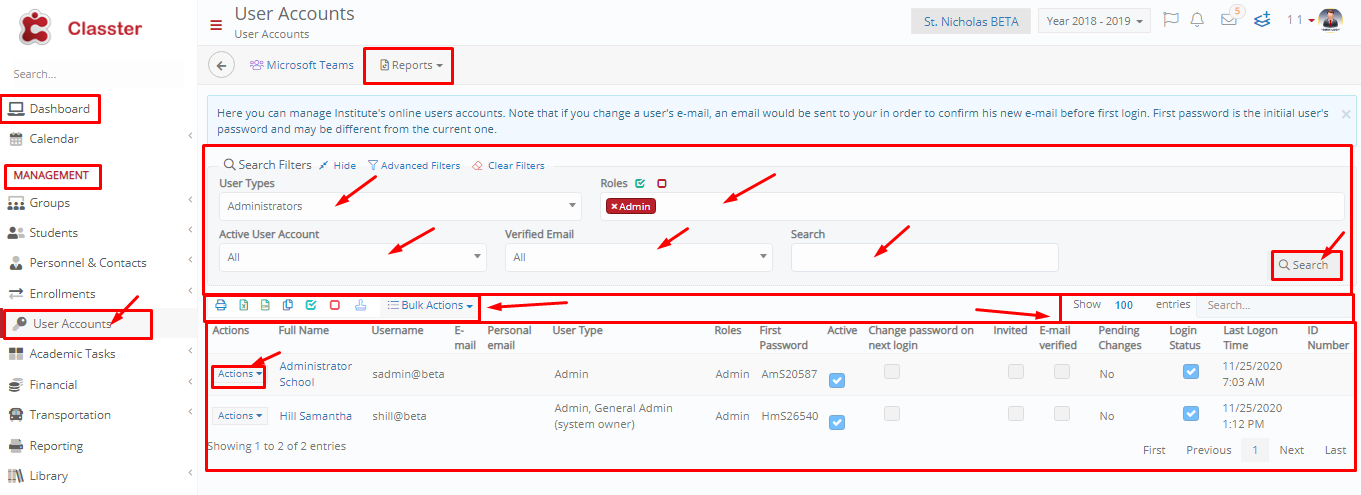
Figure 31
This is the User Accounts page, the heart of Classter regarding the management of all users. In this page you will see the following:
- The Search filter section.
- Functions buttons.
- Users List section.
User Accounts – Search Filters
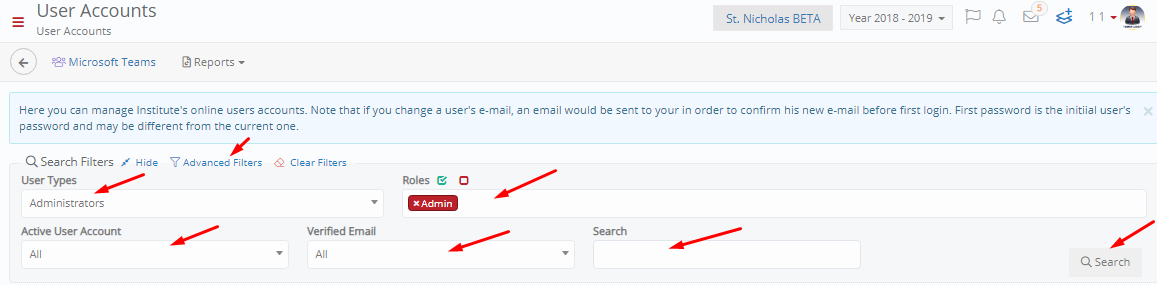 Figure 32
Use these filters to locate the system users you are looking for by selecting the:
User Type:
Remember the basic user types such as Admin, Staff/Employee, Students, Parents/Guardians, Partners/Employers, Teachers, and Alumni.
Roles:
Here you can select a specific user role which is based on one of the basic types. Remember we created user roles earlier in the manual. So, if you selected Employee in the user types filter field, then the role field will have available roles based on the type e.g Secretary.
Active User Account:
This option filters the results based on the status of users. You can look for active or inactive users. The difference is that inactive users do not have access to the portal. Users need to be active to have access to their portal.
Verified Email:
This filter distinguishes results based on if a user has verified his email. We are talking about the process in which a new user is created and has an email account connected to the system. If the user clicked on the verification link in his initial invitation email (sent by the system upon creation of account), then the user has a verified email. If this process is not complete, then the user will fall under the category of “no” in the verified email filter.
Search field Filter:
You can look for a specific user by entering the name of the user. Works independently from other search criteria.
Once You have entered your search parameters/filters, you need to click on the “Search” button (Figure 32).
Note: You can search with a combination of filters or just based on user type. Mix and match to get the user list that you want.
Advanced Filters
In addition to the standard search filters, you will find the “Advanced Filters” button which when clicked on, opens a side pain of filters (Figure 33).
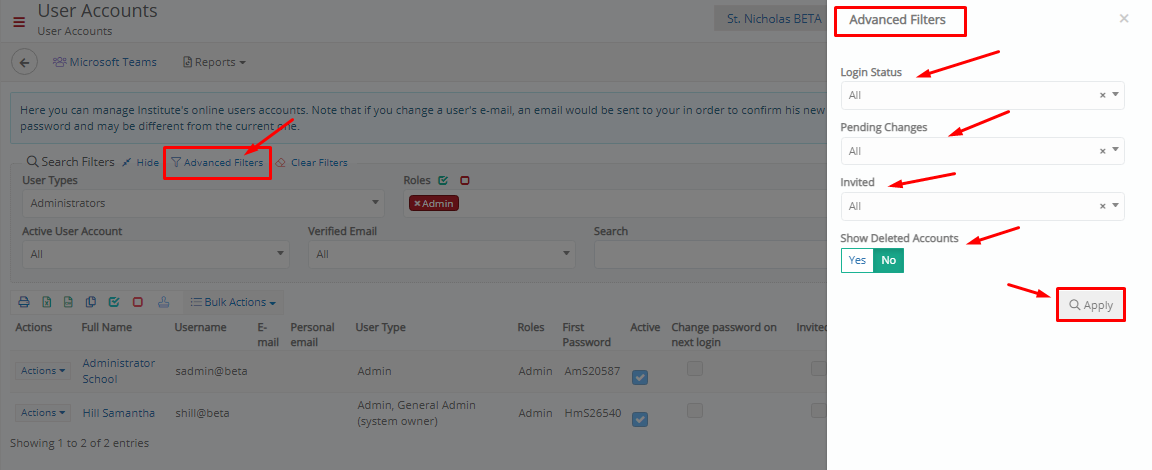 Figure 33
Use these Advanced filters to further specify and locate the system users you are looking for by selecting the (Figure 33):
- Login Status: This filter is used to look for users who have not logged in or who have logged in (initial login, first timers).
- Pending Changes: This filter is used to look for specific users whose accounts are in the process of being updated or have no updates pending. If for example you have synced an account with an external provider (O365) then the specific user account may be in the update process and to find this account, you can select the option “Yes” or “All”.
- Invited: This filter will show you the users who have received an Initial Invitation to Classter or Not. It is a useful filter for locating new users who will require invites. Initial Invitations contain users’ initial credentials to enter the Classter Portal.
- Show Deleted Accounts: This filter will include deleted or deactivated accounts in your search results.
Once you have selected the advanced filters you want, click on the “Apply” button to apply advanced filters (Figure 33).
User Accounts – Search Result List
Once you have selected your Search Filters and Advanced Filters, you can click on the “Search” button to view the list of search results (Figure 34).
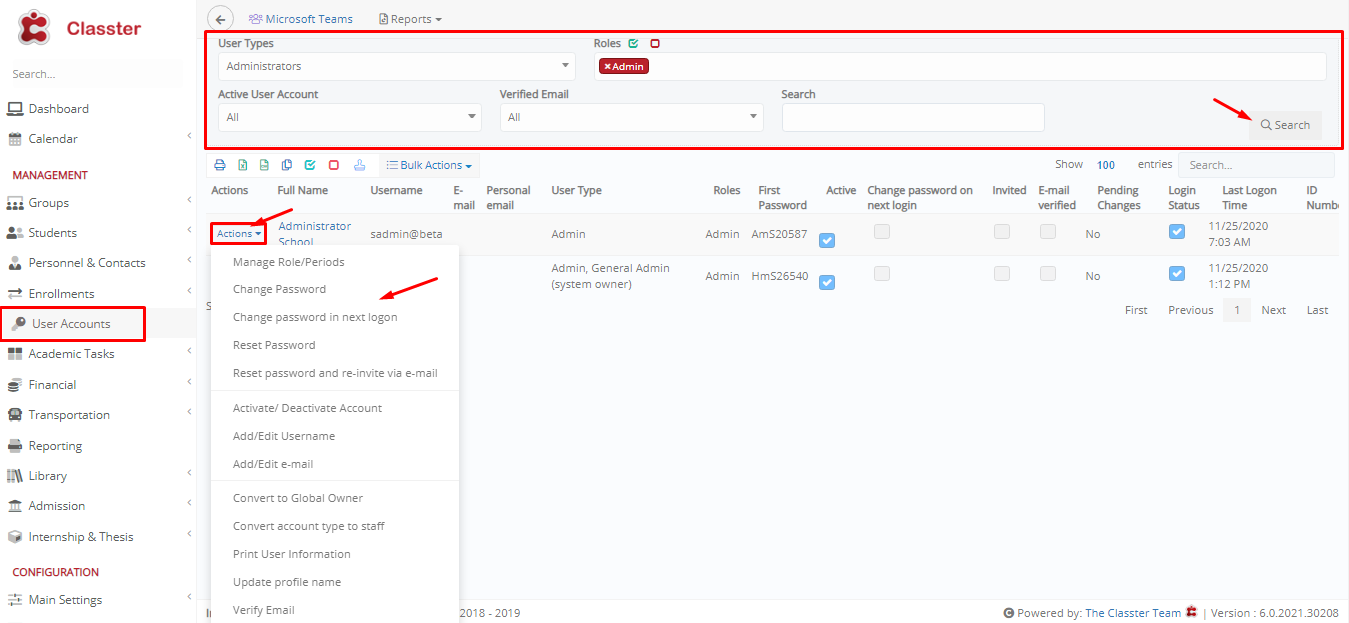 Figure 34
Now you will be able to view the user accounts you searched for. In the list you will be able to view columns with user information such as Full Name, Username, E-mail, User Type, Role, First Password etc. You will notice an inline actions button next to the first column “Full Name”.
The actions button contains all the actions you can use to edit or change user account information as well as much more.
User Accounts – Actions
By clicking on the in line “Actions” button, you will see a dropdown list with options/actions you can take regarding a user account. Lets take a look at the options/actions you can use (Figure 35).
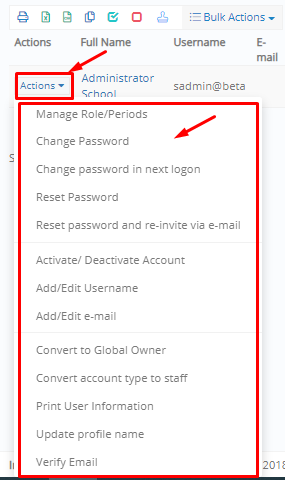
Figure 35
Actions (Figure 35):
Manage Roles/ Periods:
By clicking this option you will open a popup window that displays the academic periods of the institution and next to that, a dropdown field from where you can select a specific role for the user for that specific period. Select a user role for each period and in the case of district management you will be able to see the periods and roles for the user in more than one institution, after your changes click on “Save” (Figure 36). Keep in mind that users need to have a role in each period so that they may have access to their portal. If a user does not have a role, he will enter the portal with his credentials, but he will view a message that the specific user does not have a role for the specific academic period. Note: The user not having a role is a common mistake when adding users to the system, keep in mind you must have created roles for the user type. We saw how to create a user role earlier in this manual.

Figure 36
In the Manage Roles/Periods popup window, you can add academic periods if they are not in the list already by selecting the period from the dropdown field and then by clicking on the “Add Period” button.
If you wish to remove an academic period from the user, you can click on the delete button next to each line in the list.
Change Password:
If you click on the change password button you will open a popup window that allows you to change a users’ password. Enter a new password and confirm password below. Last click on the “Change” button to change the password of the user (Figure 37). Next time the user signs in he must use this new password.
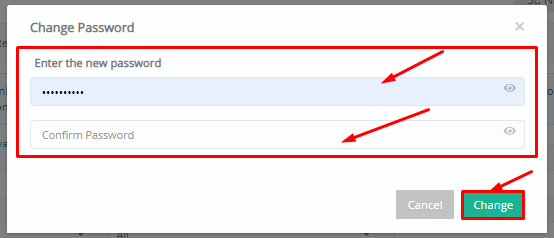
Figure 37
Change Password in next login:
If you click on this button you will inform the system that you wish this user to change his password the next time he logs in to his portal. Once you have clicked on this action the user will see the following screen appear the next time he/she logs in (Figure 38).
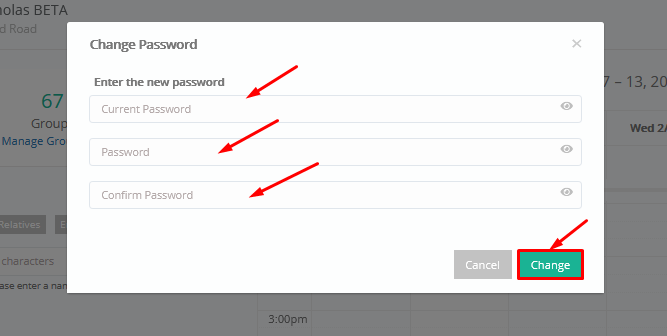
Figure 38
Reset Password:
This action if clicked will reset the users’ password.
Reset Password and re-invite via Email:
This action if clicked will reset the users’ password and re send an initial invitation message via E-mail to the user.
Activate/ Deactivate Account:
This action if clicked will disable or enable a user account. An account needs to be active for it to be accessible to a user. To deactivate an account would suspend the functions of the classter platform for the user. IT DOES NOT MEAN DATA IS LOST!
Add/ Edit Username:
This option allows you to change a user username. If you click on the add/edit username button, you will see a popup window appear in which you can change or add a username for a specific user (Figure 39). All users need a username. If you change the username then remember that the user will need to use the new username to login to the system.

Figure 39
Once you have altered the username, click on the “Change” button to apply the changes. Note: If you select an already existing username, the system will inform you that the username already exists and will not apply the changes.
Add/ Edit E-mail: If you click on this option you will be able to change a user’s email address. This change concerns the user account email. In the popup window make your change to the email and then click on the “Validate” button to validate the new email for the user. Then you will be able to click on “Change” (Figure 40).
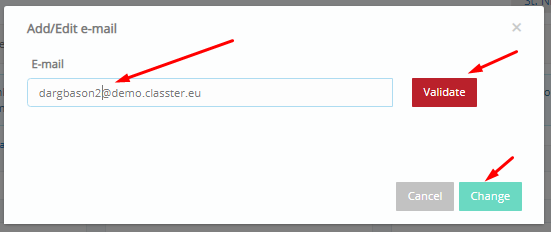
Figure 40
Note: If you add a new e-mail and click on the “validate” button you will see a warning message – “Once this change is finalized, this user will be unable to sign in, until the user verifies the new email account. Select “I agree” to acknowledge the consequences of this action.”. Click on the “I Agree” checkbox and then you will be able to click on “Change” (Figure 41).
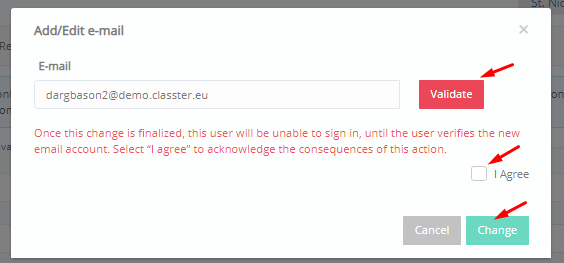
Figure 41
Convert to Global Owner Button:
This option is available in the in-line actions dropdown of the Admin user type and roles. By clicking on this option, you will essentially upgrade the admins role to that of a Global Owner. Global Owners are admin type roles that allow the user the master view of the institutions system. As a global owner you can login as any user you like and view any system user’s portal. Note: There should be only one Global Owner for every institution. You can have more than one, but it is not recommended.
Convert account type to Staff button:
This option is available in the in-line actions dropdown of the Admin user type and roles. By clicking on this option, you will essentially downgrade the admins role to that of an Employee or Staff member.
Convert account type to Admin button:
This option is available in the in-line actions dropdown of the Employee/Staff user type and roles. By clicking on this option, you will essentially upgrade the employee/staff role to that of an Administrator.
Print User Information button:
If you click on this button then you will see a new tab open with the print page for user information (Figure 42). Once you click on the print button you will print out the user – username and password.
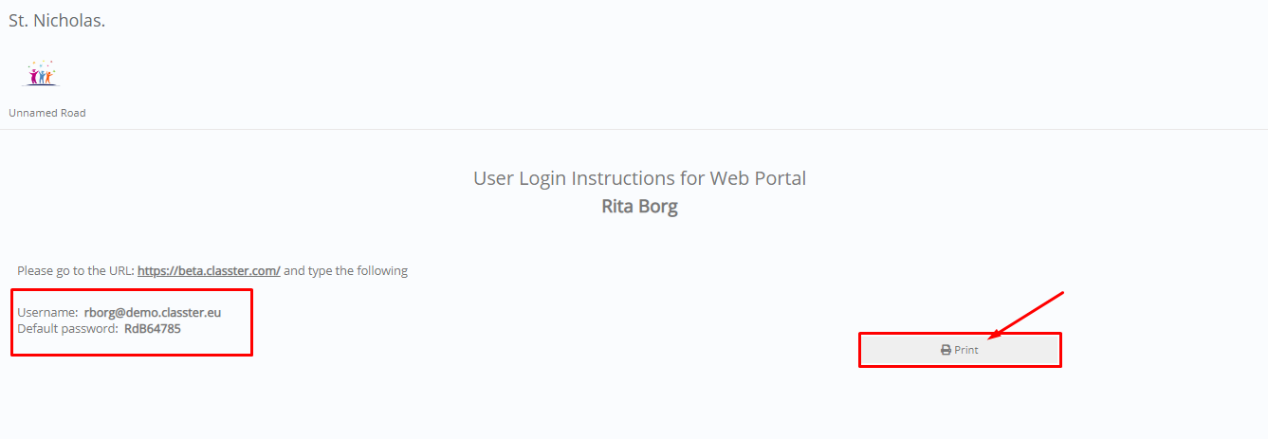
Figure 42
Update Profile Name button:
This option allows you to change a user profile First and Last Name. If you click on the update profile name button, you will see a popup window appear in which you can change or add a first or/and last name for a specific user profile (Figure 43).
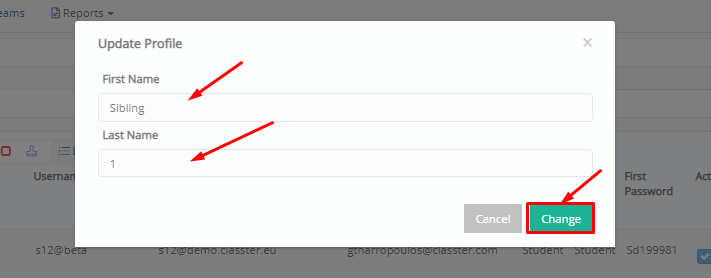
Figure 43
Verify Email button:
This option button appears only if a user does not have a verified account email. By clicking on this button, you can verify a user email, so that user may be able to login to his/her account. You cannot login to the platform with an unverified email.
User Accounts – Bulk Actions
On the top of the results list you will find the bulk actions menu. This menu contains functional buttons that can be used to apply changes to multiple users at a time, thus bulk actions (Figure 44).
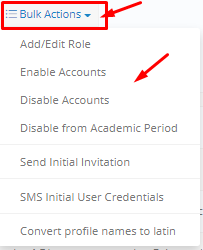
Figure 44
The Add/ Edit Role, Enable and Disable Accounts options operate in the same way as described earlier. The only difference is that to use these options from bulk actions you will need to first select all the users in the list to whom you want to change roles or enable, disable accounts for (Figure 45).
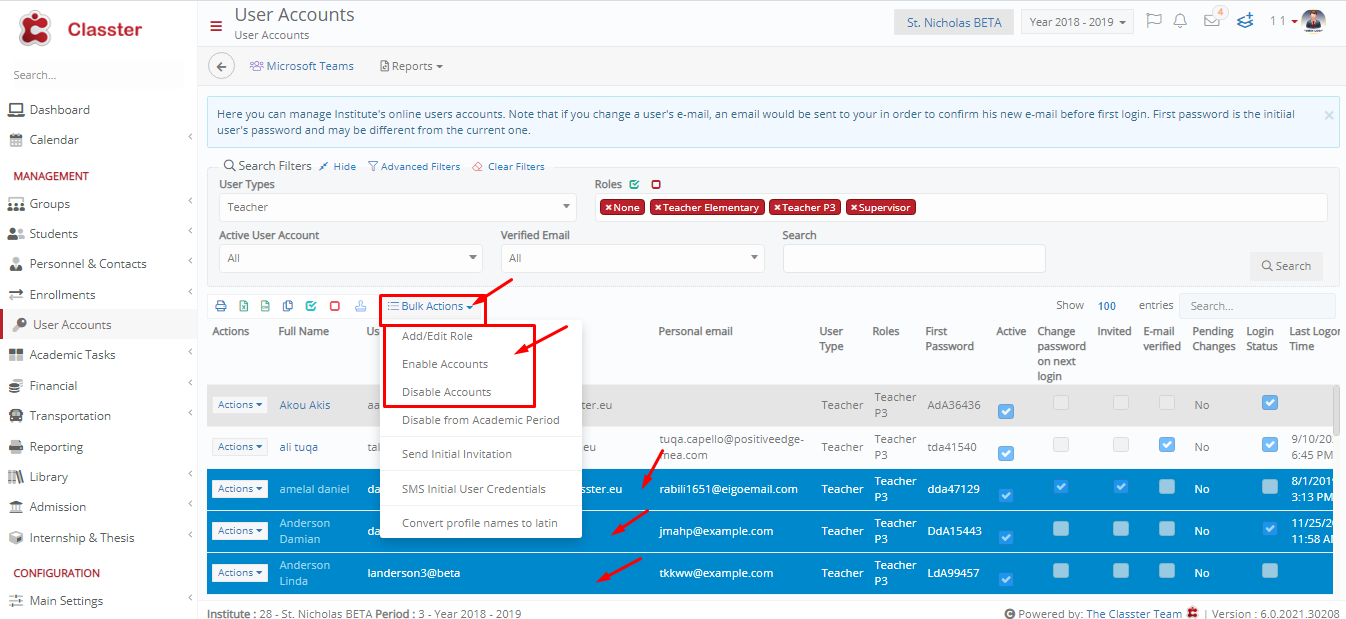
Figure 45
General Note: There are more functions of the User Accounts page that have to do with integrations. User accounts page is used to sync data from Classter to platforms integrated with Classter e.g MS Teams, O365 etc. These processes are described in the individual integrations manuals for each platform e.g MS Teams Manual.
Bulk Actions – Unique Actions
The bulk actions menu has some functions that are unique to this menu. Some actions exist in two locations such as the manage role/period button which you can find in bulk actions and in the in-line actions menu.
Here we will take a look at the function buttons that can be found only in the bulk action’s menu (Figure 46).
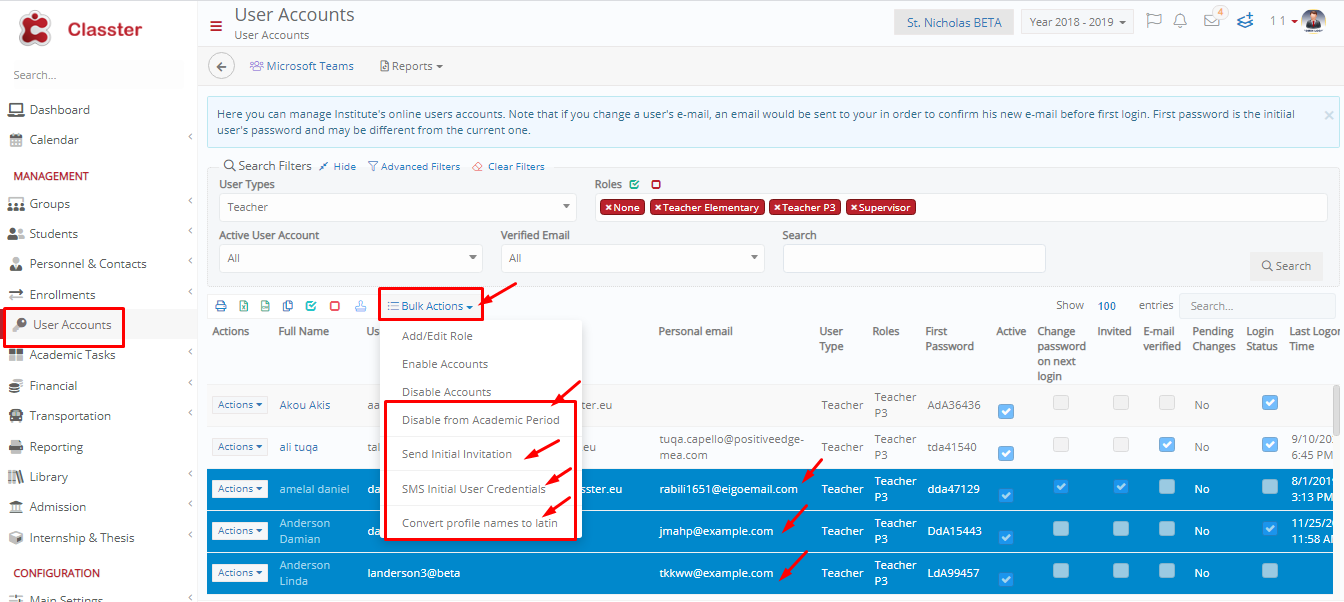
Figure 46
Actions:
Disable from Academic Period:
By clicking on the disable accounts for period button you essentially remove access to a certain academic period for specific users. Once you do this you will see the shading of the users change in the list (Figure 47). These users will no longer have the ability to login to the specific academic period. If you wish to undo this, then select the users again and click on the enable account button (Figure 48).
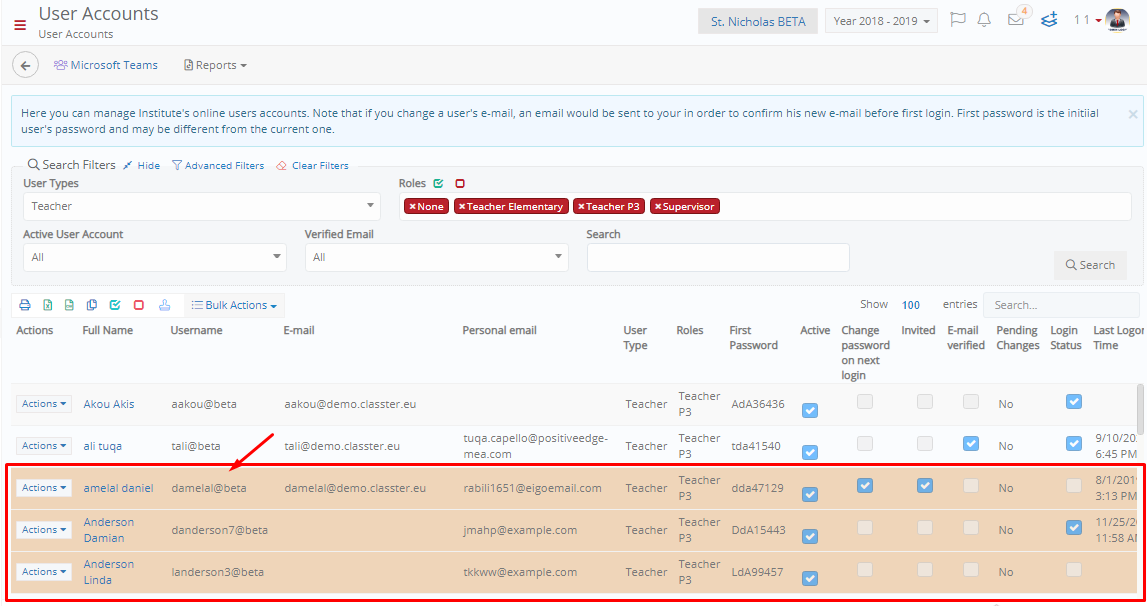
Figure 47
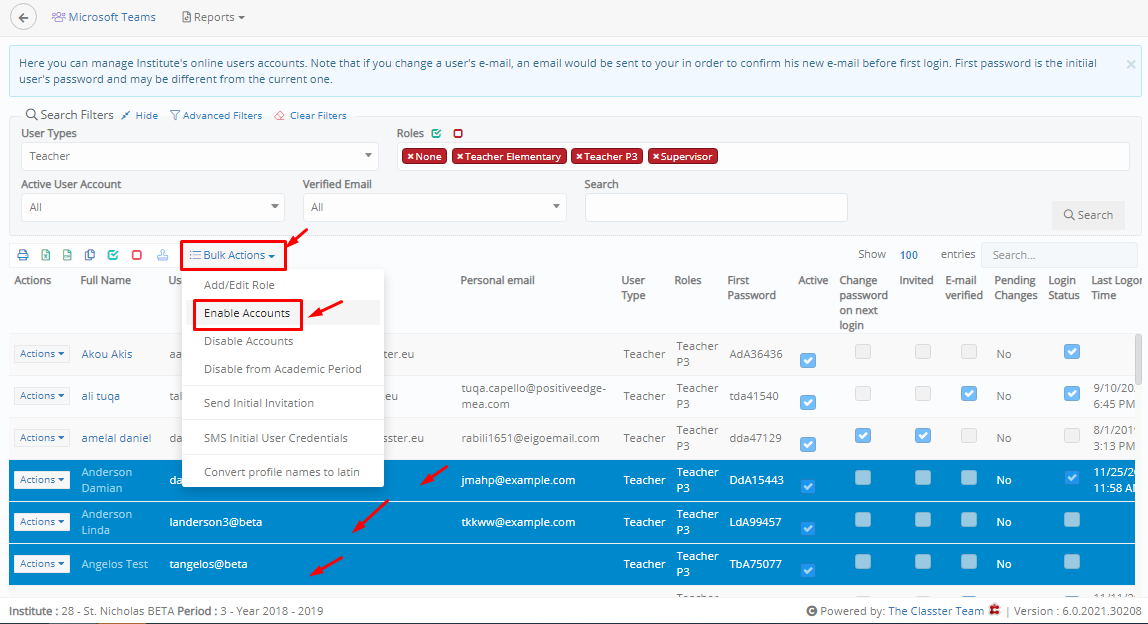 Figure 48
Send Initial Invitation button:
If you click on this button you will send the selected users an initial invitation message containing their user credentials (username, password) (Figure 49). To make sure you do not resend to users who have already received such a message, you can use the advanced search filters to generate a list of users who have not received initial invitation messages before. Note: We describe advanced filters earlier in the manual.
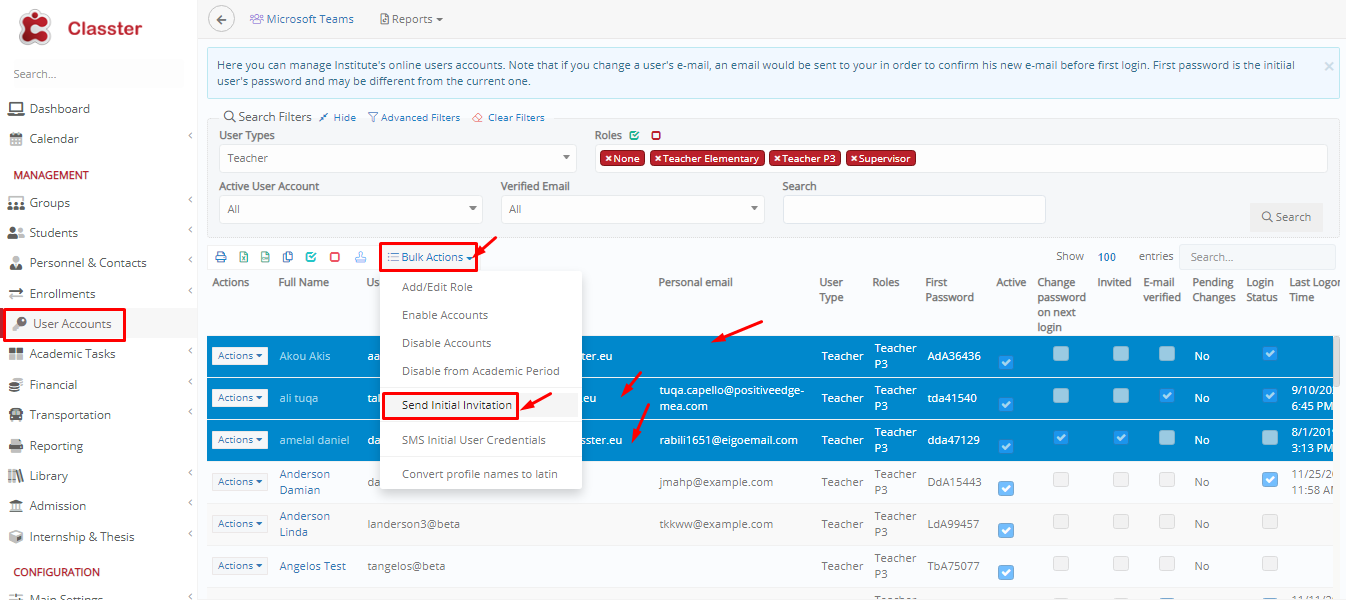
Figure 49
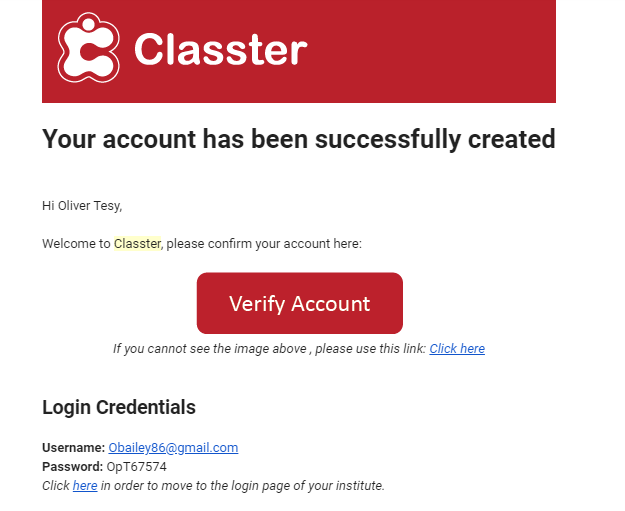
Sample Initial Invitation Message
SMS Initial User Credentials button:
If you click on this button you will send users an initial invitation with their credentials via sms message to their mobile device (Figure 51). This is essentially the same function as the previous option we described, with the difference being the method of sending the message. You must keep in mind that sending anything via sms requires an SMS integration with an SMS provider. This integration is done in the Advanced Configurations page. You must have the available credits to send sms messages.
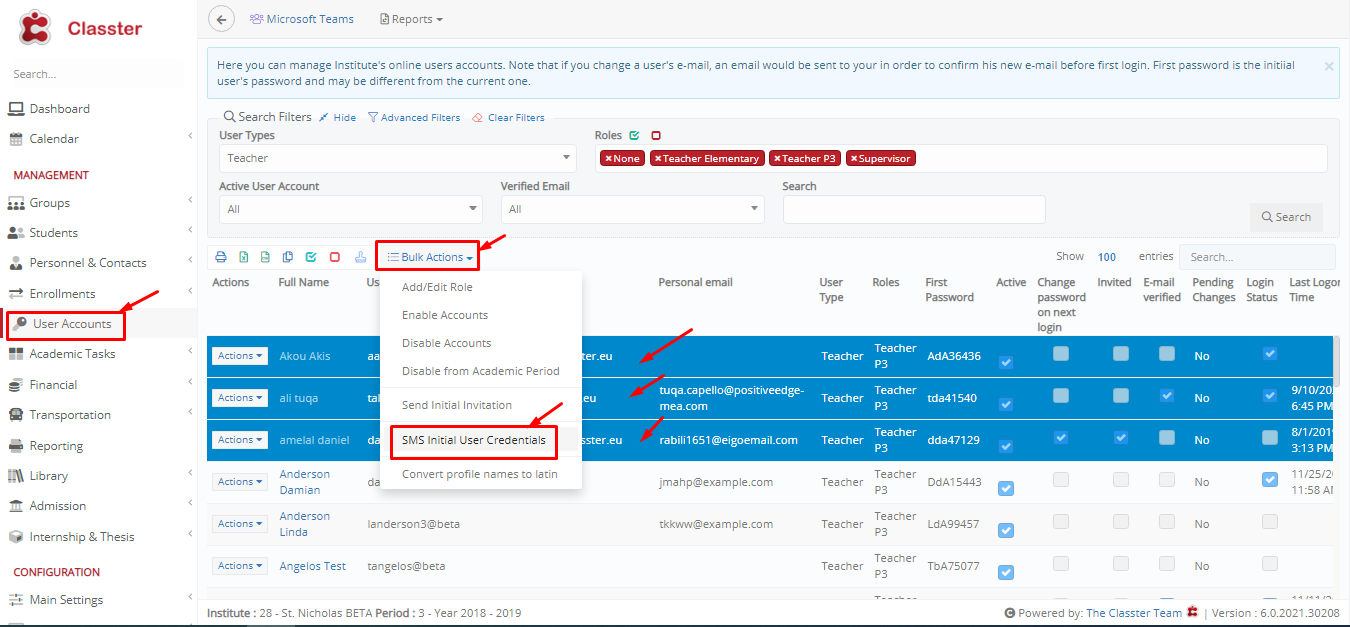 Figure 51
Convert Profile Names to Latin button:
By selecting a user and clicking on this button you will convert the users profile name to Latin characters (Figure 52). This is useful only if the name in the profile is not English or is not written in English characters (Latin). This option may be irrelevant to your institution.
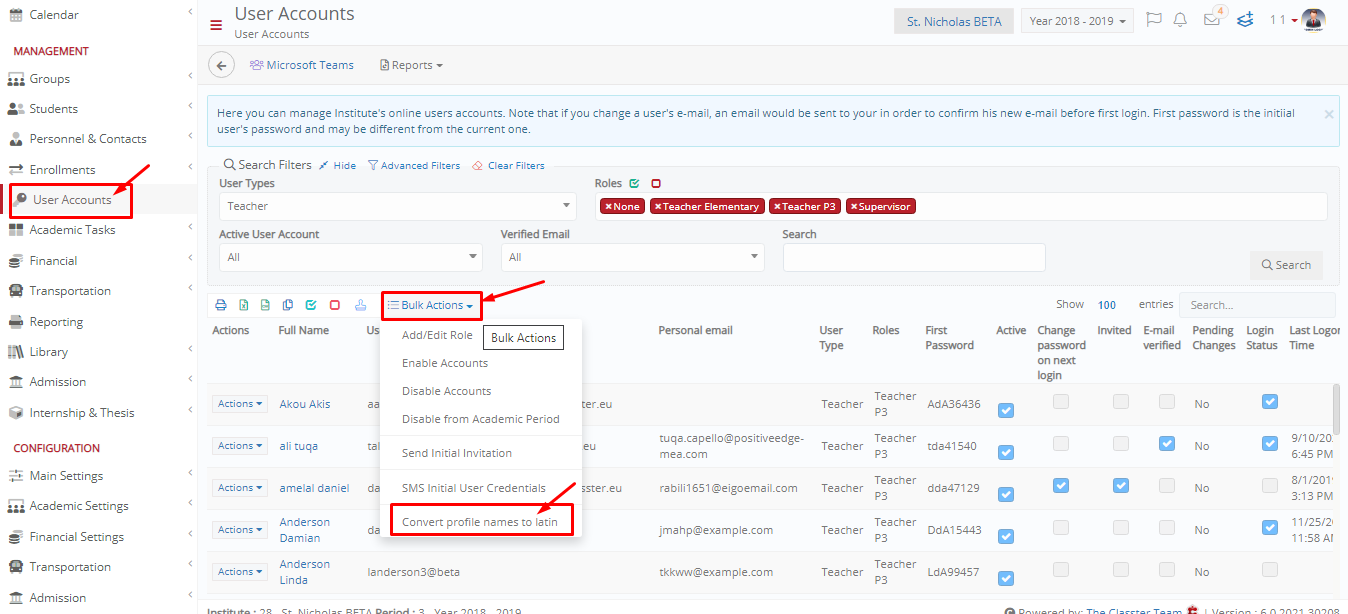 Figure 52