Integrating the email service to Classter is very important in order to get communications running for your institution.
The mailing service is offered by Classter through our account with Mailgun.
The services offered by Mailgun are transactional ones, it allows for single or bulk emailing as well as automated emails. You also have the option of using your own Mailgun account. (www.mailgun.com)
Let us look at how we set this up.
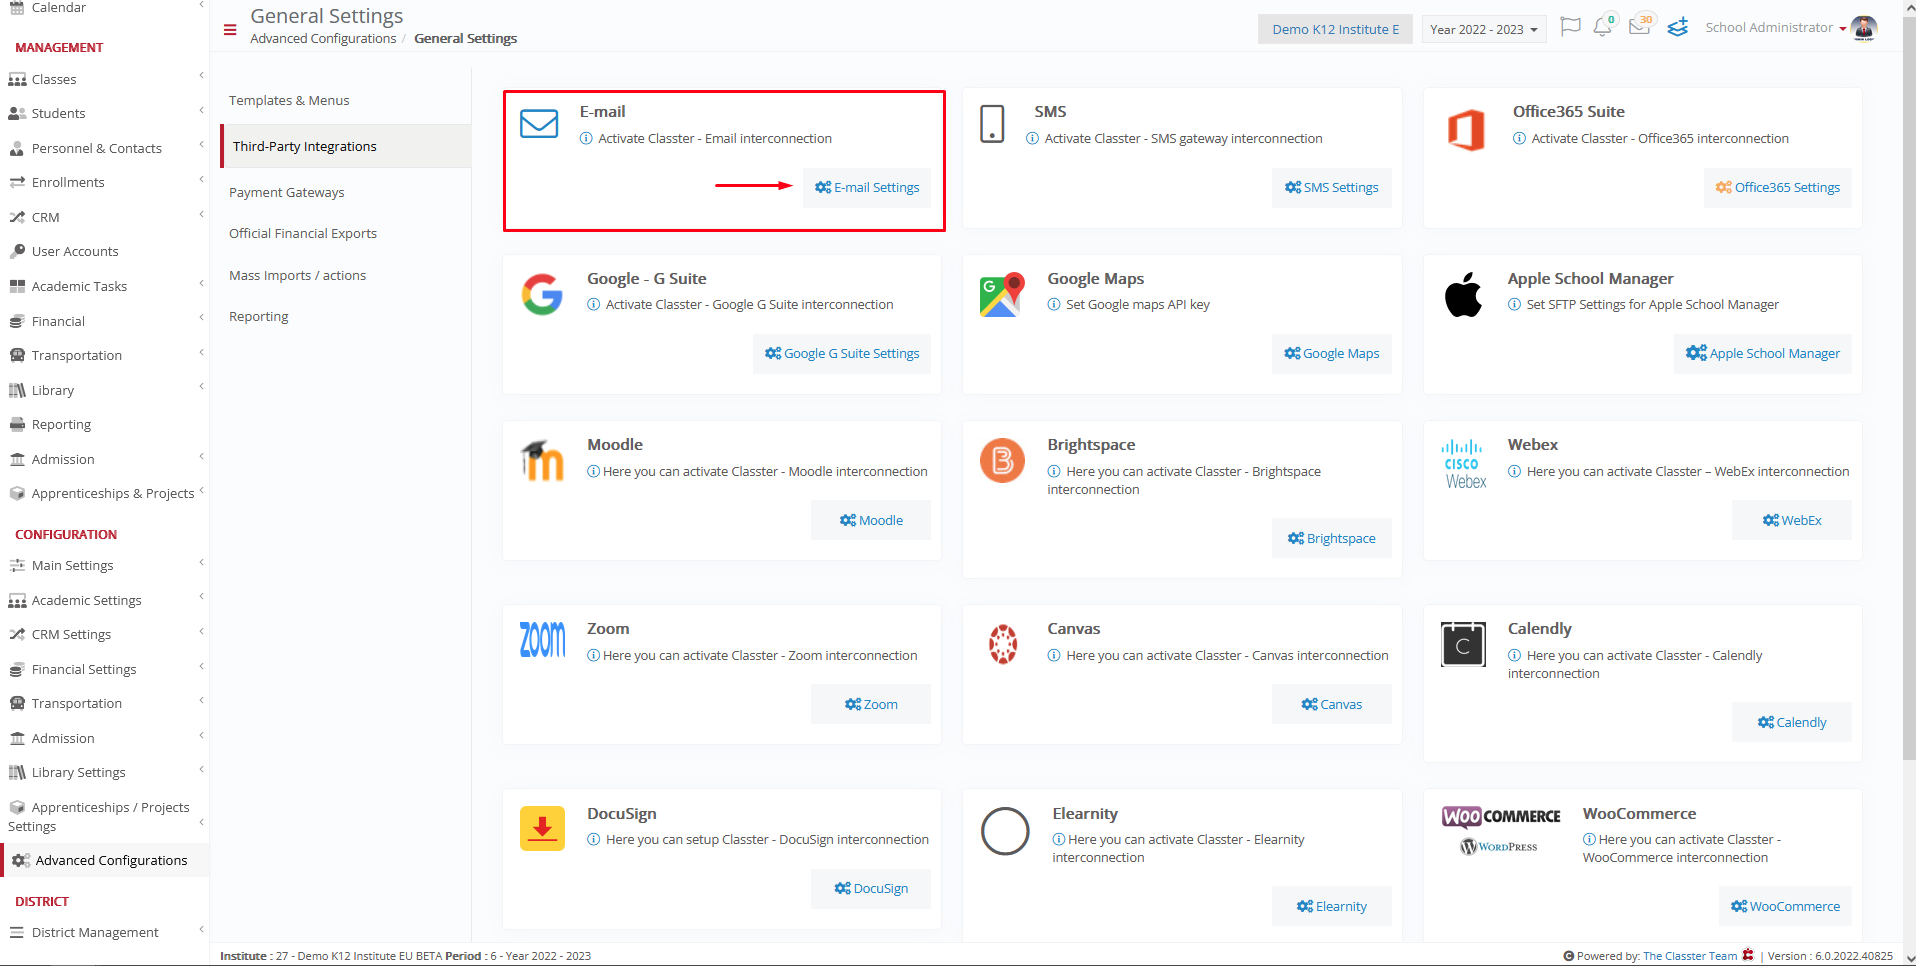
Follow the path: Dashboard > Configuration > Advanced Configuration > Third-Party Integrations > Email Settings Button (Figure 1).
Here you can see all the available integrations for Classter (Custom Integrations are available as well but are not included here).
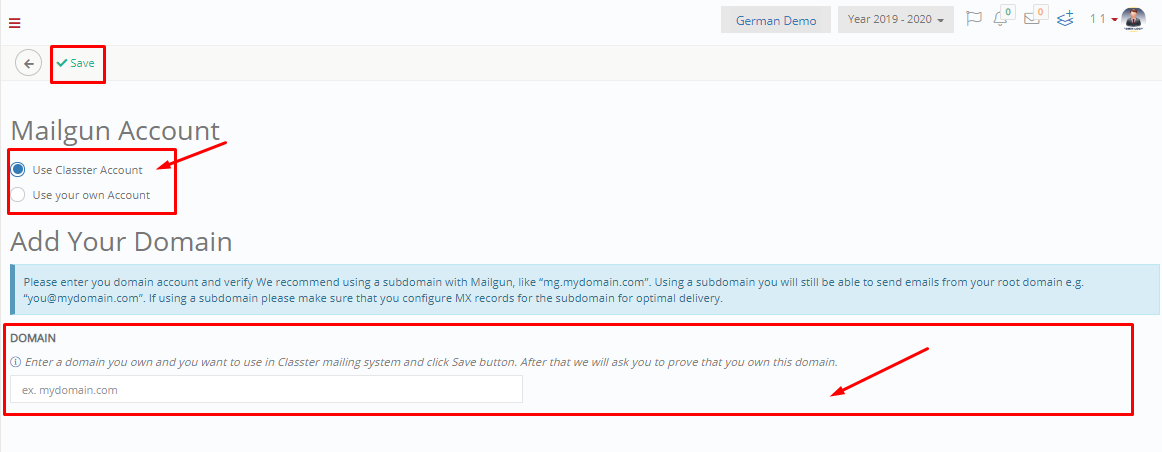
Click on E-mail Settings (Figure 1) to enter the integration page for the Email Service (Figure 2).
On this page you can see two options. Use Classter Account (Classters’ Mailgun Account) which offers up to 10,000 emails a month. Use your own Account, which involves using the account you have created (Paid or Free Mailgun Account).
Note: If you choose to create and use a Mailgun Account, we do not recommend using a free account as it uses a shared IP address, and it may create issues (Figure 2).
Note: We recommend that you use a subdomain when setting up Mailgun, e.g., mg.mydomain.com as stated in Figure 2.
Use Classter Account
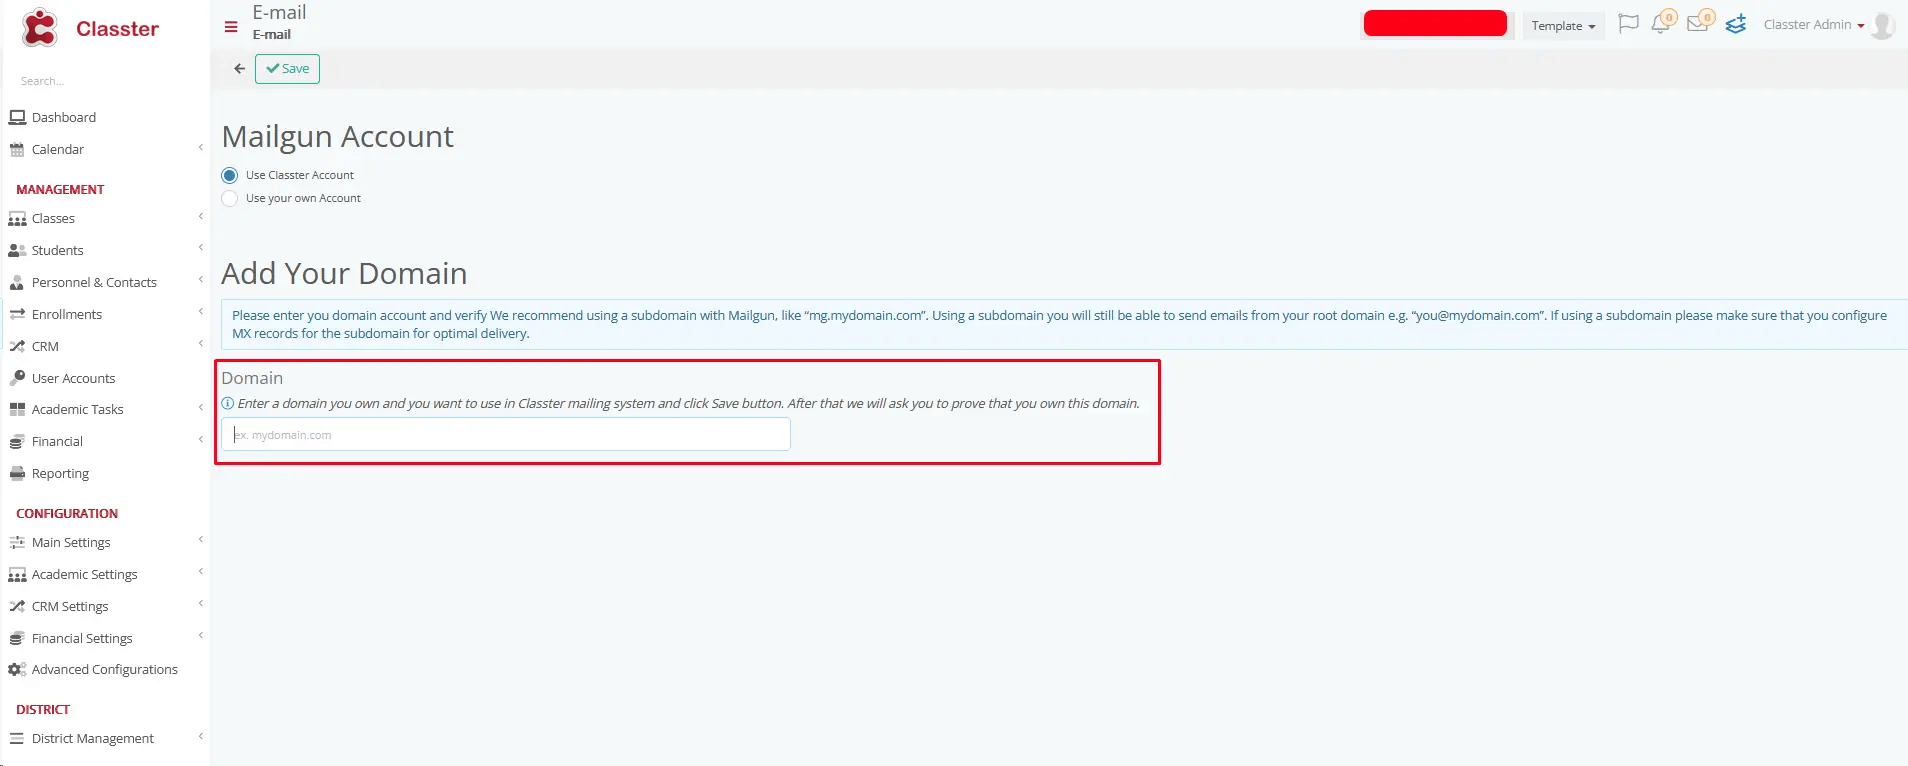
For Mailgun integration with your Classter account, as per recommendation, enter your Mailgun subdomain (e.g., mg.mydomain.com) (Figure 3) into the domain field provided below. This ensures proper configuration and functionality.
Configuration creating a subdomain
RECOMMENDED
Subdomain is of the form “mg.yourdomain.com.”
Please, be sure that you have created the subdomain to your DNS Hosting Provider, and you have set all DNS records provided from Classter.
You must include all TXTs, CNAMEs and MX records provided.
No other configuration is required.
Configuration using your domain (and not a subdomain)
NOT RECOMMENDED
Please, be sure that you have configured the following properly:
- On your own Email Server (Receive and Send):
This server handles both incoming and outgoing emails (and you have already configured it).- Confirm that you have set MX Records properly:
Ensure that the MX (Mail Exchange) records for your domain point to your Server. This tells other mail servers where to send emails for your domain. - Configure Inbound Mail Server:
Set up your mail server software on your Server to handle incoming emails for your domain.
- Confirm that you have set MX Records properly:
- Classter configuration (Mailgun integration) (only send):
Please, be sure that you have set all TXTs and CNAME records provided from Classter to your DNS Hosting provider. You should NOT include MX records provided.
General Considerations:
SPF Records:
Update the SPF (Sender Policy Framework) records for your domain to include both servers. This helps prevent email spoofing.
DKIM and DMARC:
If you have DKIM (DomainKeys Identified Mail) and DMARC (Domain-based Message Authentication, Reporting, and Conformance) configured, ensure that both servers are accounted for in these settings.
Testing:
Test the configuration by sending and receiving emails from both servers to ensure that everything is functioning as expected.
Note:
Some mail server software may have specific features or configurations for split domain setups, so be sure to consult the documentation for your chosen mail server software for any additional steps or considerations.
Always keep in mind that the specific steps can vary based on the mail server software you are using, so it is important to refer to the documentation provided by the software’s developers for accurate and detailed instructions.
Use your own Account
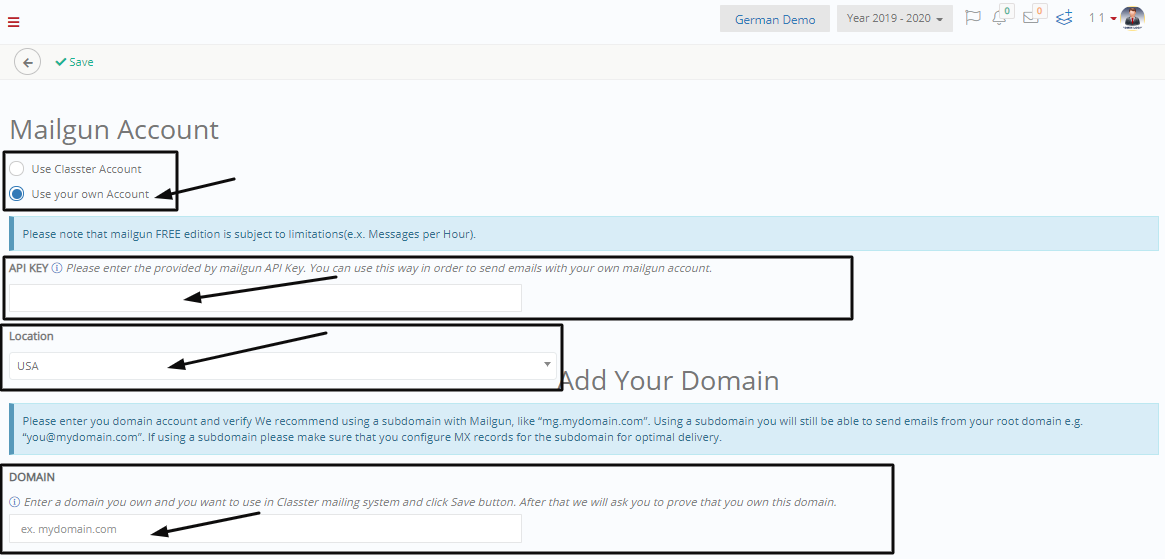
To use your own account, you follow the same steps as when you use the Classter account, with one additional step in the beginning. Go to the main page (Figure 4).
- Choose the ‘Use your own Account’ option (Figure 4).
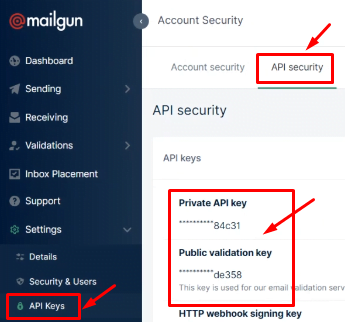
- Enter your API KEY (Figure 4). You will find the API KEY and validation key from the API KEYS tab in your Mailgun Account menu (Figure 5).
- Select your location/country from the dropdown menu (Figure 4).
- Enter your Domain in the Domain field (Figure 4).
- Click on ‘Save’ button (Figure 4).
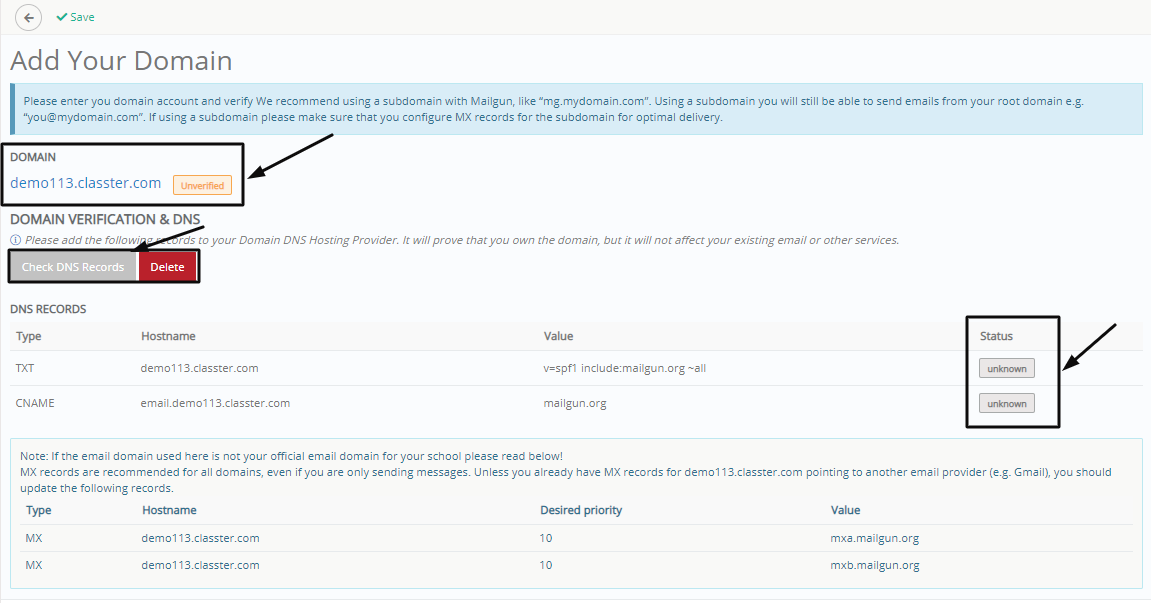
- Configure your Institution’s Email-Server (Name Server) and then add the DNS Records you see in this page (This is done to verify the email server is indeed yours) after you have saved the actions from the previous step (Figure 6).
- Once your DNS records are confirmed, the status of the files will change from ‘Unknown’ to ‘Valid’ (Figure 7).
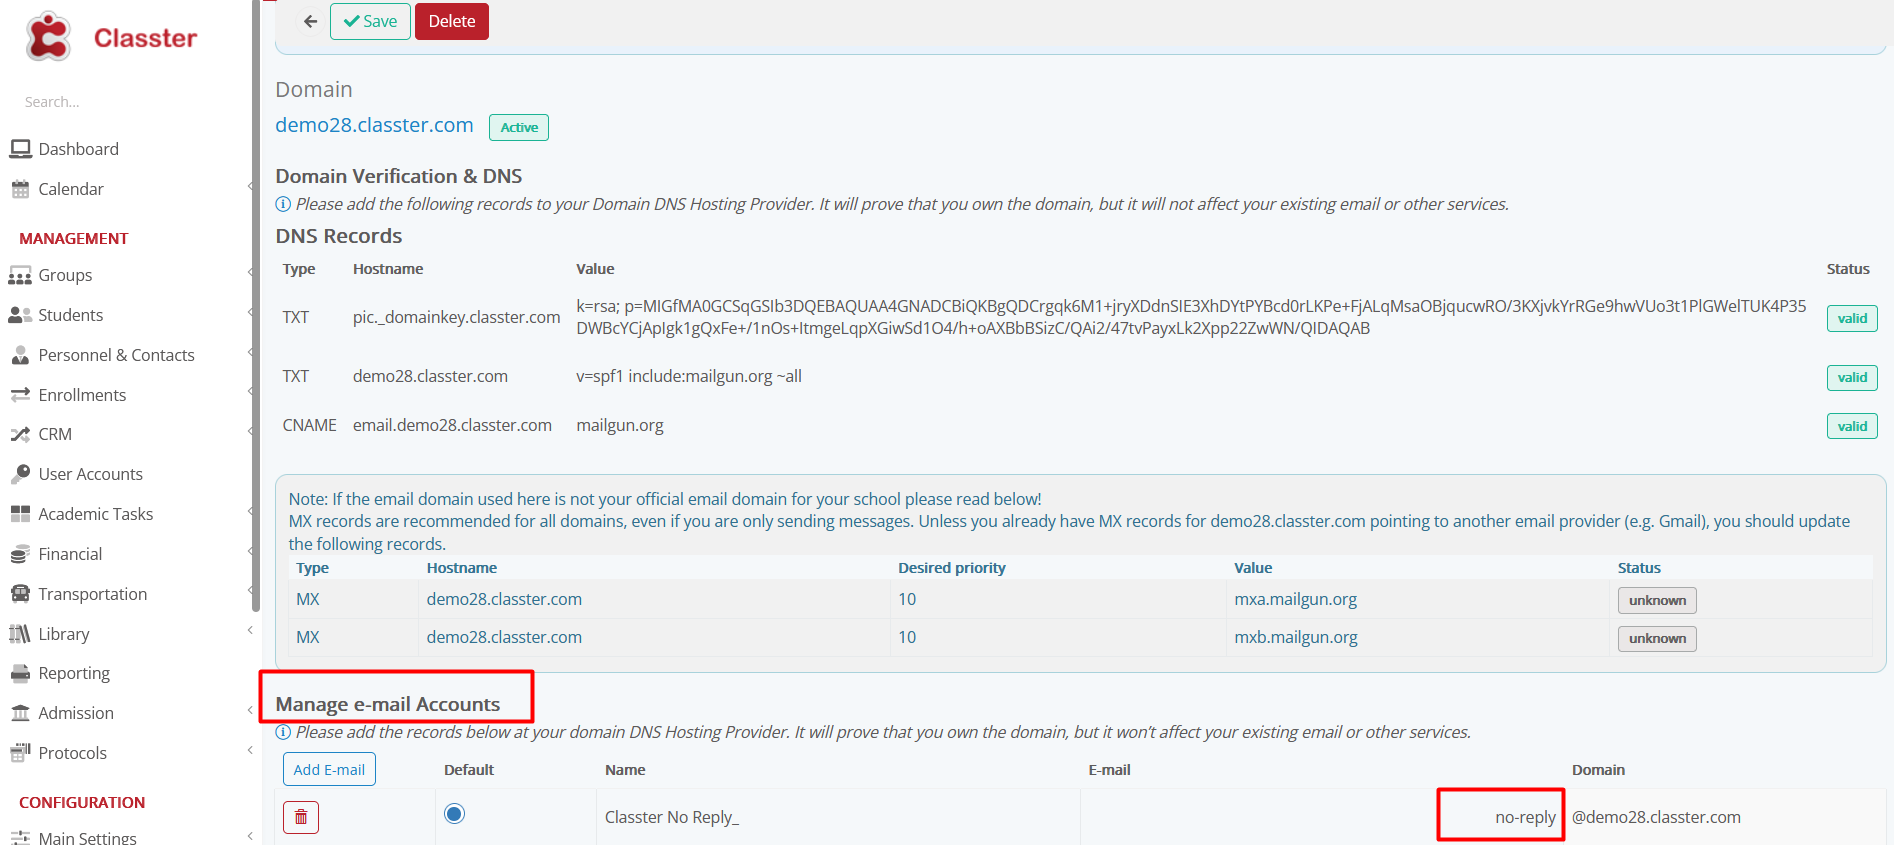
Lastly, once you have validated your DNS Records, you will see a new section below where you can enter the email you want to be used in the Name field and then by clicking on the default button next to the email you entered (Figure 8).
Click on “Save” to save changes (Figure 6).
When you use the Message Center to send emails, you will be using your Mailgun account or Classter’s Mailgun account (Figure 9).
Senders Configuration section
Ensure that in the Senders Configuration section (Manage e-mail Accounts), you include the actual sender email address as a crucial step for the integration to function correctly.
It is recommended to use a sender email address formatted as “no-reply” to adhere to best practices.
* Recipients can only reply via Internal Message within the system.
Useful tools confirming your configuration
https://www.mail-tester.com/
It’s a tool confirming all email settings configuration.
You send an email from Classter to the email address generated.
It also produces a report that gives you some recommendations that may help you to improve your score/configuration.
https://mxtoolbox.com/
It’s a tool confirming MX records set to your DNS Hosting provider. You fill your domain/subdomain set on Classter.


