Academic Institutions operate on an Academic period base, this can be a 6-month period or even a 12-month period. Regardless institutions will need to move {students} from year to year or semester to semester. This manual will show you the step-by-step process of creating new academic periods and transferring {students}, {teachers}, {groups} and {subjects}. This process is applicable to K12 Schools, Colleges/Universities and Learning Centers.
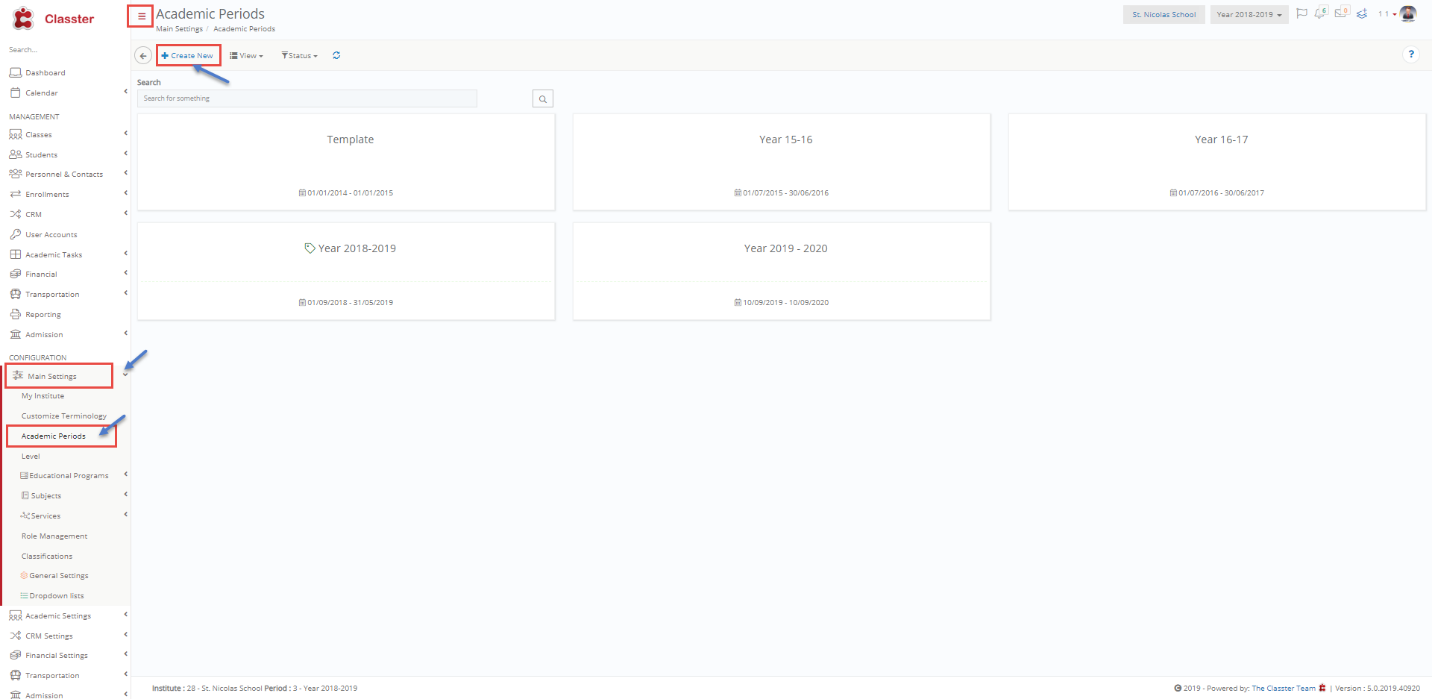
In order to create a new Academic Period, you need to navigate to the ‘Academic Period’ configuration page. To do this you must follow the Path: Dashboard > Configuration > Main Settings > Academic Periods (Figure 1). Keep in mind that creating an Academic Period involves the copying of groups, subjects, and teachers from a previous academic period. Students are transferred later on in the process.

Figure 1
Step 1
Once you reach the Academic Periods page you will view all existing Academic periods (Figure 1).
- Click on +Create New to create a new period (Figure 1).
- By clicking on +Create new you will see the Create New Period page (Figure 2).


- Description – Enter period name e.g Year 2019-2020 (Figure 2).
- Active – Enables period. If this is turned off then this period will not appear in User Accounts or in the academic period dropdown button (Figure 2).
- Enable Period for All Parents, Students, Teachers – To enable this period in the portal for users (Parents, Students, Teachers) (Figure 2).
- Default – Makes this the default academic period. Users entering their portals will be loging in to the default academic period (Figure 2).
- Start Date – Date the period starts e.g 23/09/2019 (Figure 2).
- End Date – Date the period ends e.g 30/09/2020 (Figure 2).
- Months – How many months is this period e.g 6 (Figure 2).
- Weeks – How many weeks does this period have e.g 30 (Figure 2).
- Copy data from period – Which existing academic period do you wish to copy into the new period you are creating. This will copy all data e.g Classes, Subjects, Teachers (except Students) from the selected period into the new period you are creating (Figure 2).
- Click on Save to save this new period (Figure 2).
Note: You can also do this through the Classter Manager.
A freshly made period: New Academic Period Fall Semester 2020-2021


Figure 2a
- All {sections} and {teachers} have been transferred except {Students}.


